Last of the Turkey Leftovers...

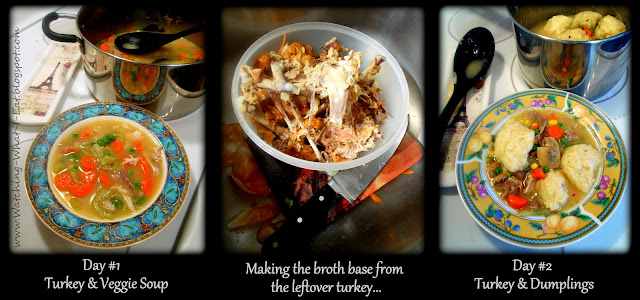
Leftover Thanksgiving Turkey ~ Making soup is a tasty and economical way to use up the last of the turkey.


Last night, we finally had the last of the leftover turkey from our Thanksgiving Day dinner ~ it was fun while it lasted.  Besides the requisite turkey sandwiches, we also ate it with different veggies/sauces/gravies, in sweet 'n' sour stir-fry, added to salad, and in my favorite way ~ as soup.

It took a few days, but we finally picked the bird clean.  I took the carcass and boiled the bejebbers out of it ~ sure did make the house smell good!  I turned that big ol' pile o'bones into a really rich, tasty stock/broth.  To that I threw in some chopped veg & shredded turkey meat and we were good to go ~ Turkey & Veggie Soup.  We ate a lot, but still managed to have some leftover soup, so the next night I doctored it up/thickened it up and turned the remaining soup into Turkey & Dumplings.  This time I made it with Bisquick dumplings.  (I guess that made the Turkey & Dumplings ~ leftover, leftover leftovers ~ try and say that fast 3-times)  Gotta love leftovers when they taste this good.  Hope you got as many meals out of your bird as we did ours!


Eggnog Bread Pudding done 3-Ways ~ Individual servings, made in the microwave


I woke up really hungry the other morning...  I had some leftover biscuits from Thanksgiving that needed using up...  I also had a little bit of eggnog and pumpkin puree lurking in the fridge.  Hmmm, looked like the makings of a bread pudding to me!  (my friends ~ Trina and Sarah ~ have been talking about/sharing bread pudding recipes with me, so it's been on my mind lately)  This time around, I decided to try making my bread pudding in the microwave, in individual glass baking cups.  Since I was making this up as I went along, I decided to try making each one just a little different.  I made this for breakfast, but it could easily be made for dessert, also.  I liked it best when eaten warm, right out of the microwave oven, with an extra splash of eggnog.  Starting my day off with a little homestyle, comfort food ~ Aahhh.  Cooking it in the microwave may not be traditional, but it sure is quick and easy.  Sometimes, I like it like that.  How about you? ~ Enjoy!

Pumpkin-White Chocolate Eggnog Bread Pudding (bottom) & Chocolate Chip Eggnog Bread Pudding (top) ~ These are tasty, easy and quick to make.  They're also a great way to use up older bread, biscuits and rolls.  It's a win-win all-around!

~  I used a 12 oz individual-sized glass baking dish and filled it with about a heaping cup of the bread/egg mixture.  The basic Eggnog Bread Pudding and the Chocolate Chip Eggnog Bread Pudding took about 1 minute and 3o seconds to cook.  The Pumpkin-White Chocolate Eggnog Bread Pudding took about 2 minutes to cook. ~

Eggnog Bread Pudding ~ Three Ways ~ single servings, made in the microwave


Basic Ingredients
  • leftover biscuits, bread or rolls ~ torn/cut up into small'ish chunks
  • large egg(s)
  • eggnog ~ low fat or regular
  • cinnamon
  • nutmeg
  • raisins
  • vanilla extract

For every one cup of  torn up ~ bread, biscuit, rolls or a mix ~ you will need...
  •  one large egg, beaten
  • 1/4 cup eggnog (or milk of choice ~ dairy/soy/nut ~ plain/flavored)
  • 1/2 Tbsp raisins
  • 1 tsp sugar or sweetener of choice ~ or to taste ~ depends on how sweet you like your bread pudding (optional, I'd definitely add if using a plain milk)
  • 1/4 tsp cinnamon
  • few gratings of fresh nutmeg
  • few drops vanilla extract
  • pinch of salt (optional)
  • microwave safe custard cups, small ramekins or mini glass baking dishes ~ sprayed with Pam
Ready to put in the microwave...

Basic Directions

In a medium bowl, combine until well blended ~ the egg(s), eggnog, raisins, cinnamon, nutmeg, vanilla extract, sugar (if using) & salt (if using).  (**add any of the following variations/changes to the basic mixture at this time) Mix in the torn-up bread and let sit for 10 minutes, so the bread can absorb some of the moisture.  Push down on the bread, several times during the 10 minutes, just to make sure it is completely covered with the mixture.  (it shouldn't, but if it seems a little dry, add an extra splash of eggnog)

Spoon into your prepared microwave safe glass custard cup/ramekin/small baking dish.  Microwave on High, for one minute.  Check center to see if done.  Depending on the size of your cup/amount of mixture cooking, it will probably take another 30 seconds to one minute more.  Do any additional cooking in 15 second increments, checking after each time.  Once it is cooked through and completely cooked/solid in the center, serve as is ~ or with an extra splash of eggnog or milk.

Variations to the Basic ~  Eggnog Bread Pudding

Pumpkin-White Chocolate Eggnog Bread Pudding
to the original recipe ~ add/change out ~ **  


  • add  ~  1 Tbsp pure pumpkin puree
  • add  ~  1 tsp white chocolate chips
  • exchange  ~  the raisins for an equal amount of dried cranberries 
**this one will take a bit longer to cook because of the pumpkin puree ~ add an extra 15 seconds at a time, until it is firm in the middle and cooked through (mine took 2 minutes total)


Chocolate Chip Eggnog Bread Pudding
to the original recipe ~ add ~ **


  • 1 tsp cocoa powder
  • 1 tsp sugar
  • 1 tsp chocolate chips or carob chips


Fresh from the Juicer ~ Calcium Builder ~ veggie/fruit juice blend

Calcium Builder ~ What a flavorful way to start your day!

I love my Hamilton Beach Big Mouth Juice Extractor.  I always have fun when I get out the recipe manual and take it out for a 'spin'.  This juice blend ~ Calcium Builder ~ would make a nice start to any Meatless Monday morning.  Enjoy! 


Calcium Builder
serves one

Ingredients
  • 1⁄4 small head cabbage
  • 1-2 fresh basil leaves
  • 1 stalk broccoli (3-4 florets with stalk
  • 1 celery stalk
  • 1 apple


Directions

Cut veggie/fruits into chunks that will fit into your juicer, shove the chunks down the chute & juice away. 

Serve straight-up or over ice.


Osso Bucco ~ from The 4-Hour Chef & Dan's Kitchen ~ Guest Cook Post

Osso Bucco ~ Made by my friend, Dan.  Photos taken in his kitchen, following the recipe in the new cookbook ~ The 4-Hour Chef ~ by Timothy Ferriss.  It looks absolutely AMAZING!  I've got to try this in my kitchen!

My friend, Dan, just got the new cookbook by Timothy Ferriss ~ The 4-Hour Chef.  On Wednesday night he made the recipe for ~ Osso Bucco ~ and posted the pictures on Facebook.  I was so impressed with the photos of how the dish turned out, that I just had to share his pictures and his commentary on my blog.  I'll be getting a copy of this cookbook for myself and will be trying out some of the recipes.  If they're all as good as this one looks, I think we're all going to be in for a treat!


Osso Bucco ~ photos and commentary by my friend, Dan...


I am a big fan of Tim Ferriss' books. The 4-Hour Chef came out yesterday. I am about 120 pages in so far. ~ The recipe ~

Beginnings of Osso "Buko". Typically, Osso Bucco is made with veal shanks, but using lamb shanks turned out just as delicious.

After placing carrots and lamb shanks in the pot, you take the canned whole tomatoes and pour on top.  ((San Marzano Tomatoes ~ definitely a difference from our Red Gold tomatoes))  Then you pour in white wine and cover with spices.
 
It took ten minutes to prep and it took another 2 hours to cook, but was definitely worth it. Unfortunately it only took a few minutes to devour . . . I was hungry. 

** a little more detailed cooking instructions from Dan, slightly adapted from The 4-Hour Chef Cookbook. ~~  Recipe is roughly:

Scrub bunch of carrots and cut off ends.  Place in bottom of dutch oven.  Take your lamb shanks and place on top of those.  Open can of San Marzano tomatoes and pour puree on top as well as squeeze each tomato with your thumb first then squeeze them with full hand and drop in.  Then drizzle about 2 tablespoons of extra virgin olive oil over the top.  Then take about 3 big 3 finger pinches of salt and sprinkle on top. Also, 10 good grinds on a peppermill.  Then pour the dry white wine (what ever dry white you like) so that it is up to 1/2 or 3/4 of the lamb shanks. Cook in preheated oven, covered, at 350F for 2 hours. Can go for up to a half hour longer in oven if necessary for timing.


I love it when friends of mine share their photos of what they're making in their kitchens.  It inspires me check out what cookbooks are inspiring them to get creative in the kitchen.  Can't wait to crack open this cookbook and take a peek!  Dan ~ Thanks so much for sharing your photos and how you made the meal!

**************************************

UPDATED 11/26/2012 ~ Kris, from over at the blog ~ The Iceland Trail ~ suggested you sear the meat before cooking, so you will get a better overall flavor to the dish.  Read his comments for more recipe ideas. Thanks for sharing, Kris!


UPDATED 12/6/12 ~ Kris, from the blog~ The Iceland Trail ~ let me know he now has a recipe blog post for his version of making Osso Bucco.  He has step-by-step photos, showing how he  makes his.  Cool!


Since I already had lamb arm chops ready to go, I followed his recipe and then tweaked it a bit.  I added bell pepper, more onion, fresh garlic, a big can of crushed tomatoes and dry vermouth. (had to make due with what I had on hand) and a couple of sprigs of fresh rosemary. (the last from my garden)

 
I cooked it in my new Dutch Oven, at 325F degrees, for a little over 3 hours. I served it with steamed new potatoes and mushrooms.  It turned out AMAZING!  Roy and I both went back for seconds, we didn't lick the plates clean, but we did do the next best thing ~ we got out the bread and butter. : )  Roy was VERY happy with the meal, as was I.  This cut of lamb can be a tad greasy, so we had to fish around a bit to get everything on the plate. I have a container of leftovers, so in the morning I'll just skim off the remaining fat and we'll be good to go for round two. (or would that round three? heehee)


I think using all the additional veggies/herbs gave the dish a flavor of ~ a cross between Osso Bucco and Cacciatore.  I'll be making this meal (or a variation of it) quite a few times over the course of the winter.  Thanks to both of you guys, this is now one of my favorite new recipes!


Homemade Chicken & Dumplings ~ just like Grandma & Cracker Barrel make!

Homemade Chicken & Dumplings ~ Honestly one of the easiest and most satisfying homestyle meals I've ever made.  Why has it taken me so long to discover this classic recipe?  The traditional 'noodle-style' dumplings are so different from the biscuit dumplings I normally make.  Two versions of the same meal & both outstanding!

I found this amazing sounding recipe for making old fashioned ~ Homemade Chicken & Dumplings.  It said it was easy to make, quick to get to the dinner table & that it tastes like the Cracker Barrel version.  Ooooo, that got my attention.  I just love Cracker Barrel's Chicken & Dumplings!


I made it for our dinner & was truly impressed, as was my entire family.  Using leftover chicken makes this recipe so easy.  Not much to it ~ flour, broth, cooked chicken & a couple of spoonfuls of other on-hand pantry ingredients.  Even though the ingredient list is small, the flavor is BIG & so very comforting!  The recipe is simple to follow, quick to get to the dinner table & is just as good (if not better) than the one I've ordered countless times at my favorite 'country-style' restaurant.  We demolished the first batch I made and I've had requests to make it again ~ soon, very, very soon.  It was THAT good.


So, if you're looking for a meal that tastes like ~ something your grandma might make... that is comforting & makes you think of simpler times, when food wasn't fancy ~ just rustic, flavorful & perfect for large or small gatherings... just everyone sitting around the kitchen table, enjoying each others company... or when you'd like to order chicken & dumplings in your favorite 'country-style' restaurant, but want to make it cheaper at home, using leftover chicken & few other ingredients... or maybe even for a potluck ~ consider giving this recipe a try.  I think you'll be glad you did.  :)

P.S. ~ Since I'm posting this after Thanksgiving, I was thinking this might be a perfect way to use up some of the leftover turkey we all have hanging around the fridge.  Same meal / preparation, just a different type of bird...  I think I'll be making this again, just turning it into ~ Homemade Turkey & Dumplings ~ the next time around.  Maybe throw in a few frozen peas/carrots. Or maybe not.  Depends on my mood. : )


Homespun Christmas Holiday Cupcakes ~ Beth's Cake Creations ~ Guest Post


The day after Thanksgiving is the day I start getting my Christmas Spirit on.  Out come the boxes of Christmas decorations & up goes the Christmas tree.  When you have a Christmas-happy kid, the sooner the better, as far as he is concerned.  So, I thought this would be a perfect time to share some holiday cupcakes, created in the kitchen of my friend, Beth.  She is an Artisan Cake Decorator and designs some of the coolest cakes and cupcakes.  (check out the other posts I've done on her amazing creations)  This batch (pun intended) of pictures are from some of the baked goodies she's made in the past, for friends and family.  I really like the homespun feel of some of the designs, they look like something I could pull-off in my kitchen and her snowmen are just downright adorable!

The poinsettia cupcakes have a real 60's vibe to me.  I love my poinsettias!  As a kid, I remember there always being poinsettias at Grandma Bunni's house during the Christmas holiday season ~ both real and plastic.  There were no realistic 'silk' flowers back then, just lots of fake-looking plastic ones.  I actually still have a few of her old decorations.  I've kept those that I have a soft-spot for, and they still come out every year. (if you look at my posts from last December 2011, you'll see some of them in the photos ~ You'll know'um when you sees'um :)  Some of the decorations are well over 50+ years old and they're still kicking. (gotta love plastic) 


Hope these pictures get you into the holiday baking mode. They do me, and I'm not even a baker!


Season's Greetings & Happy Holidays!


Feasting on Thanksgiving Day

Happy Thanksgiving!

Today we are going to watch the Macy's Thanksgiving Day Parade.  Today we are going to watch football.  Today we are going to feast on all the traditional Thanksgiving Day foods and eat ourselves into a food coma.  Today we are going to eat a lot of desserts ~ pumpkin pie, apple pie, Bachelor Pumpkin Pie mini-tarts, ice cream and whatever else is brought to our Thanksgiving table, by our dear friend, Dick. 


My friend, Spencer, shared his recipe for making ~ Bachelor Pumpkin Pie.  It only has three ingredients: a can of pumpkin pie filling, a tub of Cool Whip and a store bought, premade graham cracker crust.  He just gently folds the pumpkin pie filling into the Cool Whip and pours it into the graham cracker crust.  Then he lets it sit in the fridge until it is chilled through.  This pie has a soft, light and airy, chiffon-like texture, instead of the denser, traditional pumpkin pie texture.  We decided to make it into little individual 'mini' pumpkin pies by using the mini-graham cracker tart-sized crusts.  That way everybody gets a 'whole pie' to themselves and we don't have to mess around with cutting the pie into slices, we can just dig right in. Thanks for sharing, Spencer!


Just in case you were wondering why the Indian has a green smile... my son says it's because he's just eaten his spinach.  (J LOVES his spinach :)  Hope you all have a fantastic day ~ Gobble, Gobble!


Honey Dijon Chicken Tenders ~ Lovin' my George Foreman Grill


I'm loving my George Foreman Grill for helping me get meals on the table quickly.  I'll often start my cooking by steaming a mix of chopped, fresh veggies in the microwave.  While that's cooking, I'll make a quick side garden salad.  Once that's finished, I'll get the chicken tenders and onions cooking on the George Foreman Grill.  They only take around 5 minutes and about a minute before they're done, I'll pour some Honey Dijon Mustard salad dressing on them ~ it gives them a nice flavor.  If I've thought about what I'm making in advance, I'll even let them marinate in the dressing ahead of time.  While the chicken tenders are cooking, I'll set the table.  Dinner's ready in about 20 minutes, start to finish.  Quick cooking meals are great for days when I'm short on time.  Thanks, George Foreman!

Vanilla Soy Creme Brulee/Flan

Vanilla Soy Creme Brulee/Flan ~ I started out making homemade vanilla soy yogurt, then turned that into vanilla soy 'soft cheese/Greek yogurt', and then turned that into a vanilla soy 'faux' creme brulee/flan.  I love tinkering with different recipes in my kitchen.  How about you?

I was playing around in the kitchen one day, trying my hand at making homemade soy yogurt.  I followed this recipe, using light vanilla soy milk, and came up with  a very tasty batch of vanilla soy yogurt.


I enjoyed the yogurt as is, but decided to keep going with the process and turned the soy yogurt into a vanilla soy 'soft cheese/Greek yogurt', following this recipe.  Waiting for the liquid to drain out of the soy yogurt was the hardest part of making the 'soft cheese/Greek yogurt'.


Now that I had a thick and creamy 'soft cheese/Greek yogurt', I decided to continue playing around with it.  I mixed up a small box of vanilla instant pudding with about 1/2 cup soy milk and combined it with the vanilla soy 'soft cheese/Greek yogurt'.  I put the mixture in ramekins and let it setup in the fridge until firm; sprinkled it with brown sugar & broiled it in the oven until the brown sugar melted/caramelized.  


To me, the resulting dessert tasted like a cross between creme brulee and flan.  So, I'm dubbing it my ~ Vanilla Soy Creme Brulee/Flan.  I enjoy tinkering around with different recipes, combining them and seeing what you come up with ~ and when you're playing around with desserts, it's always good.

Sauteed Kale, Tempeh, Mushrooms & Walnuts ~ Meatless Monday

Sauteed Kale, Tempeh, Mushrooms & Walnuts

Sometimes when I'm out of ideas for a meal, I'll just scrounge around the fridge and pantry, looking for things to inspire me... or if that fails, things that need using up.  I can almost always come up with something tasty and on nights like this, I really like to make meals that I can throw together in my wok/skillet.

This time what I found was turned into ~ Sauteed Kale, Tempeh, Mushrooms & Walnuts.  I sauteed everything together in the wok, with a little olive oil.  Cooked it until the kale was wilted, the tempeh was heated through and the mushrooms started giving off a little of their liquid.  Then I added ~ a few walnuts, spices and some jarred sauce ~ just before it was finished cooking.  It took no time at all to made a little Spinach and Strawberry Salad and I was good to go ~ dinner on the table in under 20 minutes.  Sometimes, it's nice to cook without recipes or expectations.  Letting the meal evolve as you find things to use can lead to some great food and I'm all about a good meal.  


Spiced Pumpkin Pie French Toast

Spiced Pumpkin Pie French Toast ~ Super simple to make and super tasty.  The bread really soaks up the orange color from the pumpkin.  I'm loving the flavors of fall!

I've been thinking of ideas for using canned ~ Pumpkin Pie Filling ~ in ways other than the traditional pumpkin pie recipe that comes on the back of the can.  Today, I came up with this simple pumpkin infused version of the classic French Toast. I'm calling it my ~ Spiced Pumpkin Pie French Toast.  I tweaked my Cinnamon Vanilla French Toast recipe a bit, and it delivered.  My son went nuts for this meal and begged for a second plateful.  Good thing the recipe makes 8 slices, otherwise Momma would have had to make another batch!   :)


Spiced Pumpkin Pie French Toast
6-8 slices, depending on the size of your bread
* you can use pure pumpkin puree, just add some pumpkin pie spice, a little sugar and a splash more milk

Ingredients
  • 3 large eggs
  • 1/2 cup canned pumpkin pie filling*
  • 3 Tbsp milk
  • 1/2 tsp cinnamon
  • 6-8 slices of your favorite bread
  • cooking spray/Pam
  • favorite syrup
  • butter or margarine


Directions

Preheat large skillet over medium-low heat.

In a blender, place eggs, pumpkin pie filling, cinnamon & milk ~ blend until combined.  It'll take just a few seconds. Pour mixture into container large enough for a slice of bread to lie in it flat.

Place one slice of bread in container, flip over ~ make sure both sides of bread are covered in egg/pumpkin mixture ~ only dip as many pieces of bread as will fit in the skillet at one time.  

Spray preheated skillet with Pam & put as many egg-dipped slices of bread as will fit.

Cook for approx. 2 minutes per side or until both sides are golden brown.

Dip & cook remaining slices of bread.  Keep all slices warm until finished cooking.  When ready to serve, top with butter & syrup.  Enjoy!


2-Ingredient Pumpkin Pie Mousse

2-Ingredient Pumpkin Pie Mousse ~ My son came up with this sweet and satisfy dessert while helping/playing around in the kitchen with me tonight. Canned pumpkin pie filling and Cool Whip ~ that's it... but it tastes SO good!

I've been tinkering around with recipes using canned pumpkin pie filling.  My son, J, was helping me out in the kitchen & came up with an incredibly simple dessert featuring the aforementioned pie filling.  He begged to lick the spoon, the bowl & the measuring cup ~ he liked it that much.  A cook that enjoys his own cooking... I like that.  :)

This is such an insanely easy recipe and it's perfect for little helpers.  No worries about eating it right from the bowl, spoons or fingers.  You just have to make sure some actually remains in the bowl to chill, that way there's some left for dessert.  heehee

J's 2-Ingredient Pumpkin Pie Mousse
serves 4

Ingredients

  • half of a 30 oz. can of pumpkin pie filling (like Libby's Easy Pumpkin Pie Mix)
  • 1/2 tub Cool Whip of choice, thawed
  • a little extra Cool Whip for topping ~ if desired

Directions

In a medium bowl, gently fold together the pumpkin pie filling and the Cool Whip.  Chill for an hour or so.  Serve in pretty cocktail glasses or bowls.  Garnish with a little extra Cool Whip ~ optional.

Feeding Body & Soul ~ My Club Med EXGO Reunion Vacation

The food at Sandpiper Bay was just as expected ~ Excellent!  Thanks to my friend, Sharon, for taking a lot of food photos, too.  I kept eating my desserts before I'd taken a picture of them!  Oops...

Back Story ~~ Twenty years ago this week, I went to work for the international vacation resort company, Club Med.  My first assignment as a GO (what they call those who work there) was working with children guests, in Ixtapa, Mexico.  I had been to a Club Med as a guest myself (at the now-closed village of Sonora Bay) and liked it so much that I decided I needed to work for the company.  It took awhile to get hired, but the wait was worth it.  It was a magical time in my life.  I've worked in many different villages (what they call the resorts), in many different locations in the US, Mexico, the Caribbean and the West Indies.  Working as an Annex (specialty restaurant) Manager, hostess and with kids.  I cherish all the friends and memories that I've made in Club Med, past and present.  Absolutely priceless!  As we like to say... Once a GO, always a GO. ~~

Current Day ~~ Last month, I traveled to ~ Club Med Sandpiper Bay ~ in Florida, for a reunion.  It was not just any reunion, it was a former Club Med GO reunion.  We now call ourselves EXGO's and we had a blast!  Many brought their families and friends with them to share in the event.  A lot of us had called that village 'home', for a season (a period of 6 months) or even longer, so it was great to be back there again.  Since I didn't have to do any cooking for the week that I was there, I took some food photos to share on the blog instead.  Club Med offers LOTS of great food, and the White Chocolate Bread just can't be beat.  Twenty years later and I still crave it...  So, here is a 'snapshot' of my vacation ~ first the food pictures and then the pretty, tropical village photos.

Rise and Shine!  It's breakfast time!

Every morning (after my yoga class) I had a great-big-egg-white veggie & cheese omelet.   Lots of other breakfast goodies tempted me, too...


Out of the pool, it's time for lunch...


After cocktails, it's dinner time...


I ate REALLY well while I was on vacation.  I stuffed myself full of my old favorites and found some new items to love, too.  After all that eating, I'd stroll around the village, enjoying being there again.  It felt just like coming home.  :)  Here are some of the lovely views that greeted me every day...

I had the pleasure to become friends with one of the most wonderful GO's during my vacation, her name is Mary and she is a Sailing GO.  All during my stay, she always had a sincere smile on her face and a caring attitude.  Even when she was off duty, she was always quick to answer any question or lend a hand.  Her enthusiasm for her job was apparent and was much appreciated!  She truly embodied the classic Club Med GO Spirit.  She also provided me with an excellent bit of brush-up tutoring on the Hobie Cat.  Thank you for everything, Mary!! YOU ARE THE BEST ~ YOU ROCK!!  :)
 
Life around the village ~ (clockwise, from top left) the main restaurant, buffet-style service; the adult infinity pool on the St. Lucie River; the view from my yoga mat; feelin' the tropical vibe.  Starting my day off, looking out at this view, was worth getting up early for.

While at the reunion, I saw old friends and made lots of new ones, too.  So many of us have worked at the same villages, just at different times, and we know so many of the same people, that it feels like we've known each other for years ~ even after just a few days.  I look forward to our next reunion ~   See you guys soon! 


Hope you've enjoyed these photos as much as I've enjoyed putting them together.  As a little bonus, as I was getting the links for the post, I came across multiple sites/versions of the recipe for the Club Med White Chocolate Bread ~ that I love so much.  I also found an a now dormant blog site ~ Black Pearls ~ that has some slightly (and not so slightly) outdated (2006 & prior) commentary on Club Med.  The pricing on 'extras' and what is now 'all-inclusive' has changed a lot since the blog was last written, but I really enjoyed the comic wit of the writer & some of the things said were spot on.  (especially since he is writing on experiences that go back to the 90's, when I used to work there)  Check it out for some giggles & a true 'from a guests viewpoint' of the Club.

ThanX GO


It seems quite a few of the villages used to pass out the White Chocolate Bread recipe.  Here are some sites that I've come across that have good instructions/comments from home cooks, talking about what changes they've made to the/their recipe to get it to work at home.  Many of the links are written about Sandpiper Bay, and the one from ~ In Erika's Kitchen ~ was written just a few months ago.  Too bad I didn't think to ask for a copy of the recipe for myself while I was there! :)

For all of you visual learners out there, check out this video taken in the Sandpiper Bay kitchens...


For those who like the written word, check out these sites for versions of the Club Med White Chocolate Bread recipe...

Sami Cone ~ (this is the site where I found the above video)

In Erika's Kitchen ~ from April 2012, in Sandpiper Bay

Love and Olive Oil

The Fresh Loaf ~ comments from home cooks on what worked for them

The Club Med Diet

Check them all out & find the recipe that sounds good to you.  There are TONS more sites out there, so if you still need inspiration to get in the kitchen and start baking, just search the 'net to your hearts content.  :)
 
Related Posts Plugin for WordPress, Blogger...